A couple of times a year I need a car with a tow bar, for things like the two-weeks-away medieval festival I go to, or taking things to the dump. Hiring a vehicle for these things would work out to be a thousand dollars a year or so, which isn’t viable.
Since owning the Pulsar I’ve wanted a tow bar on it, and after a fairly tight pack for festival this year I was determined to get one to be able to tow a trailer. I like the look of my slightly-racier-than-stock turbocharged ST-S model, and didn’t want a big honking cut out of the bumper like I’ve seen on some others. After shopping around a lot, I couldn’t find enough information on what this model required, as Hayman Reese (the main manufacturer really left in Australia) and some others said their kits were “All models”. A local company refused to even bring one in as they would be stuck with it if I didn’t want the required modifications.
I shopped around a lot, and finally found Tow Bars Australia. Emailing them to get the installation instructions, I had a PDF of the install instructions within an hour or so. I wanted it by the weekend (a long weekend was coming up) and after calling them at lunch time on Wednesday, I had the kit nearly exactly 24 hours later. $19 shipping, delivering it via a private courier driver to my work. There was a part missing from the loom, and I had that within two hours.
I can’t recommend Craig and his company highly enough. They’ve got great prices and great service. I don’t get kickbacks, but I got great service. The kit I purchased is the Hayman Reese / Trailboss tow bar (they’re the same company). For $497.30 I got the tow bar, the wiring harness, a 50mm tow ball and even some D-Shackles!
Installation
The first step was to remove the bottom part of the boot to get to the panels for the wiring. The moulded trays are held in with bolts, requiring a 10mm socket wrench. Easily removed. 🙂
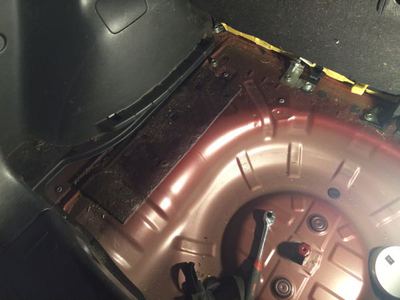 Boot RHS |  Boot RHS |
|---|
After that, removing the centre sill panel was easy - push the centre of the small panel plugs, remove the blanking piece under the lock and lift!
To remove the interior panels, there should be a small panel plug (push the centre in and pull it out) and a larger “tie down” T-shaped plug which you have to gently lever the middle out of.
 Popped in | 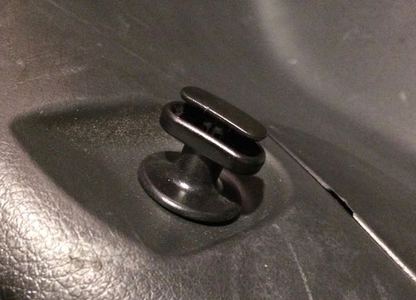 Popped out |
|---|
Once you’ve pulled the pins, gently lever the side panel off, starting near the sill panel you just removed - pull towards the middle of the boot and it’ll all just pull out - though it’ll stay connected near the belt feeder.

Removing the interior
This will give you plenty of access to attach the ground (white) cable and plug in the harness. Do the other side’s wiring, running the cable where it’ll be behind the sill panel.

Plug-in harness and ground cable
This is a good time to test everything, turn the car on and check indicators/brakes/reverse lights before putting everything back together. I secured the intermediate cable to the metalwork with a little sticky tie that I had from another project.

Behind the sill panel
While doing these kinds of things, you end up with piles of screws and other widgets that you need to keep track of, intending to return them to their original position. Since I’m following instructions and diagrams it was super easy to keep this in order! Bags, numbers, annotations. Normally I’d write the location “under bumper, middle, frame” etc. but this was just simpler.

Keeping things organised
Removing the tail lights is pretty easy, undo two 10mm nuts and pull straight backward.

Behind the tail lights
It took a lot more force than I expected, but it’s just the very snug nature of the clips/locator pins. There’s a dinky white t-piece at the “front tip” of the light assembly, this is designed to slide into a mating notch on the lights.

Tail light locator devices
Make sure you unplug the light assembly harness again before you go too much further. This is probably why you’re told to do the lights last - but I was impatient and had time to do this small piece which didn’t impact on drivability. It was a Thursday night and I had to go to work - removing the bumper or doing other work would have been too much.
Removing the bumper should be a fairly simple affair - a bunch of clips and screws.
One thing they didn’t document is that my car has a pair of screws on the very tips of the bumper which require a T20 Torx screwdriver to remove. I’m not sure if this is an ST-S thing, or something else, but they’re there.

T20 Torx Bit
Reading the instructions before I started, I had to giggle at the “see all that impact foam, feel free to throw that out!” line. It basically falls off - held on by a few locator pins and the bumper being in the way.
Impact foam
I have to say this next partwas one of the most harrowing things I’ve done to any of my cars. See that rhombus-shaped outline? You have to cut along that line. Go outside it, you’ll potentially damage the chassis rails of your car. Enjoy!

The end of the rail
I couldn’t see what was behind it, so for the first one I spent a LONG time drilling small holes starting at the middle, then working my way out with a drill and many weak Dremel cutting wheels. The second one took less than a minute with my angle grinder and a proper cutting wheel - less time than I spend with the grinding wheel cleaning up the first hole! 🙂 You can just cut a triangle focused on the “lower outside” direction, but it’s not much advantage because the nuts on the rail have to clear the spot.
The night before, I’d tried a test assembly to made sure the bolts fit, the threads were good etc. It was a good thing I tried, because the threads on the mounts were entirely full of paint, and more than one was enough out of spec so as to round off a bolt’s thread. I’m not entirely blaming the welded nut, because I should have checked as I was installing it, but it took a fair amount of work to clean out the nuts and then restore the bolt’s thread with a file. Expending that mental energy saved me a lot of potential pain later.
Luckily I recently inherited a large array of tools, and included within the giant pile of imperial-measurement taps, there was a pair of M12 taps, including the exact one I needed! 🙂

m12x1.25 tap

Back of rails
I decided to give up for the night, and emailed the team at Tow Bars Australia to find out the best course of action. Craig responded at twenty to eight on the Saturday morning of a long weekend. That’s dedication to customer service 🙂 He agreed it was fine, that they did it all the time. I took to the rail VERY carefully with a round grinding bit on my Dremel and expanded it just enough to get it all together.
Once that was done, the rest of the fit together was painless - the left hand rail was easy - and the other parts just fit. I sprayed over the cut edges with some self-etching paint I had on hand, just to make sure that rust doesn’t find its way in.

It fits!
As I said originally, the main point was to get this in without cutting more than I had to out of the bumper, so I was excited to see that it nearly went back on without having to touch the edge at all!

Rather close!
I taped up the area on the black edge that was near the tow bar, to allow me to mark out the workpiece. There were three slots to cut initially, allowing the uprights and the bolts to clear the plastic. After that I decided to round it off, just to reduce the likelihood of cracking in the future.
Funnily enough the dimensions Hayman Reese provided were close to right - just not in the direction that me (or the tow bar installer) had initially expected. Measured one way it would have taken us about 25mm into the red area of the bar, but I only needed to cut to the edge of the black area.
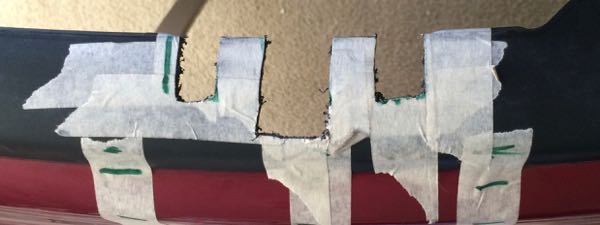
Initial cuts - I took it down to the bottom of the middle section.
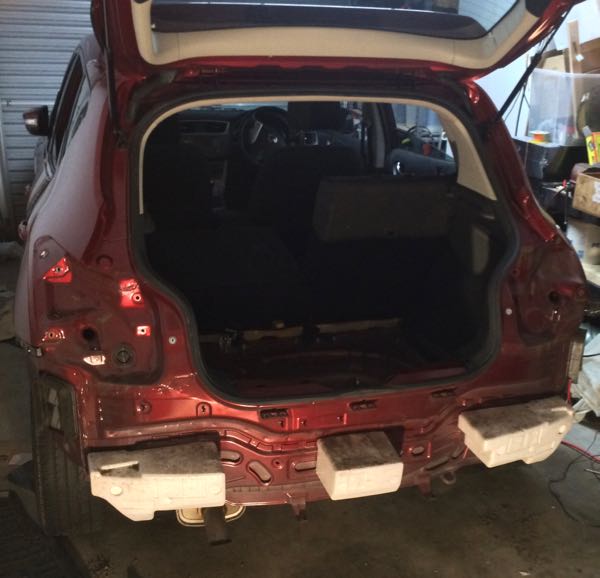
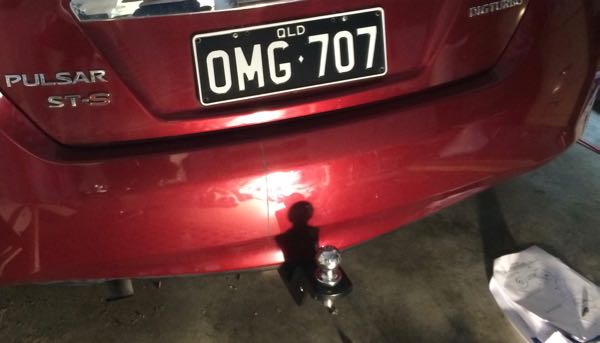
It fit! The reinstallation of the bumper/other parts was the reverse of taking them off, and it all went easily. Here it is in the final position. Ignore the scratch up the middle - that’s rather old - and caused by my clumsiness in the past 🙂
Removing the tongue after it was all back together leaves a tiny lip of the bar. It looks fantastic without the tongue on it, barely noticeable and not affecting the look of the car at all. Given I only use it a couple of times a year, this pleases me 😀
I’m still working on the place to put the 7-pin flat plug, but expect to be able to mount it sideways under the back of the car, meaning I have to lean under the car to plug it in, but you won’t see it unless you go looking. Something I can do later 🙂
All done!
Tools required
- Torque wrench capable of ~185nM of torque.
- Socket wrench and ~100mm extender
- 10mm socket (Car)
- 18mm Socket (Bar mounts)
- 24mm Socket (Tongue)
- 18mm Spanner (Bar Mounts)
- 2x Fine Flat blade screwdriver (Trim plugs)
- Phillips head screwdriver (Car Screws)
- T20 Torx Screwdriver/Bit (Bumper screws)