If you’re attempting to monitor servers that aren’t on the same domain as your Root Management Server you need certificate-based authentication to allow communication between hosts.
There are plenty of articles on how to setup a Certification Authority, we’re running a standard Windows 2008 setup.
Here’s our Standard Operations Procedure for replacing certificates on agents.
- Login with MSTSC to the server requiring the new certificate
- NOTE: When you login, if you’re given a temporary profile it won’t work.
- Open
https://[your root ca]/certsrv/in a web browser - Click on continue if you get a https certificate error
- Go to internet options -> Security -> click on trusted sites
- Click on Sites
- It should have
https://[your root ca]in theAdd this website to the zonefield - Click Add
- Click Close
- On the web page click
Download a CA Certificate, certificate chain or CRL - You’ll probably get another https signing error, ignore it.
- Ensure:
- CA Certificate has the entry with
Currenthighlighted - Encoding method is
DER.
- CA Certificate has the entry with
- Click
Download a CA Certificate - Save the Root CA Certificate somewhere and double click on it to open the key file.
- Ensure the details look right for your Root CA and click
Install certificateon the general page - Click Next
- Select
Place all certificates in the following storeand click browse - Select
Trusted Root Certification Authoritiesand click OK, then next and Finish. - It’ll warn you about an un-validated certificate, click yes.
- The root CA trust certificate is installed
- In the browser click
Homein the top right - Click
Request a certificate - Click
Advanced certificate request - Click
Create and submit a request to this CA - Fill in the fields as below Name = FQDN of client Type = Other OID = 1.3.6.1.5.5.7.3.1,1.3.6.1.5.5.7.3.2 Create new Key Set CSP = Microsoft Enhanced Cryptographic Provider v1.0 Key usage = Both Key Size = 1024 Automatic key container name Mark keys as exportable = tick Request format = CMC Hash = sha1 Friendly name = FQDN of client (must match first field)
- Click submit
- It may confirm that you wish to request a new certificate, click yes.
- You’ll be issued a request ID.
- Login to the certificate server and open Certificate Authority from Administrative Tools
- Expand the tree and find Pending Requests
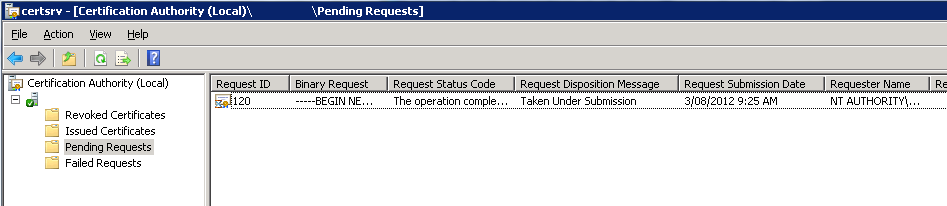
- There should be a request matching the ID you were given in the previous steps, right click on it and click All Tasks -> Issue
- Go back to your remote connection to the agent
- Click Home on the Certificate Services screen
- Click View the status of a pending certificate request
- Click the blue link – it should only show you yours
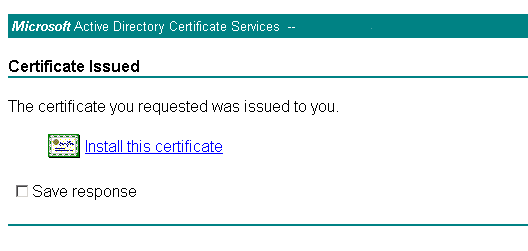
- Click Install this certificate
- Click yes to install it
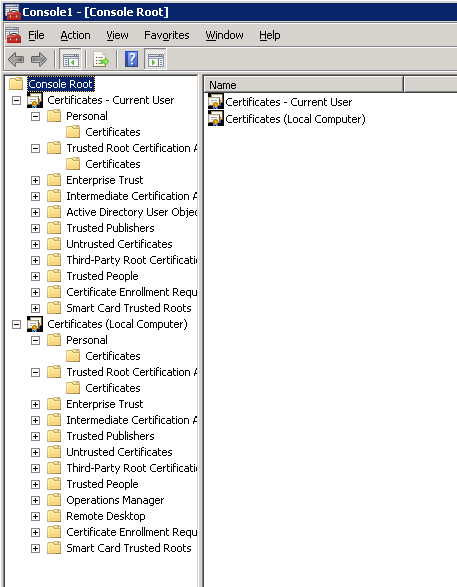
- On the Agent run mmc.exe
- Click
File -> Add/Remove Snap In - Add
Certificatesand select theMy user accountoption.` - Add another
Certificatesbut this time selectComputer accountthenLocal computer - Click OK
- Expand the two trees like this:
- Under
Certificates – Current user -> Personal -> Certificatesyou’ll find the client certificate. - Drag that to the matching folder under
Certificates (Local Computer) - Under
Certificates – Current user -> Trusted Root Certification Authorityyou’ll find the root CA certificate. It should have the same name as the Root CA hostname. - Right click on the certificate you imported previously and click copy.
- Ensure the expiration date of the one you’re working on has the correct expiration date – it should be 02/08/2027. (If it’s expired, hello future!)
- Go into the matching
Trusted Root Certification Authoritiesfolder under Certificates (Local Computer) and right click->paste the cert into there. - Go to
Certificates (Local Computer) -> Personal -> Certificatesand on the certificate you just dragged in there, thenRight click -> All Tasks -> Export - Click next, select Yes export the private key and click next
- The export file format should be PKCS #12 (.PFX), don’t tick anything in the boxes.
- Click next
- Enter a simple password you’ll remember and click next.
- Save the file somewhere you can navigate easily to via command prompt.
- Click next then Finish
- Open a command prompt as administrator (right click on it and click run as administrator)
- Navigate to where you put the key
- Run
MOMCertImport.exe [keyfile], substituting[keyfile]for the filename that you just exported.- 32-bit servers, run it from the SupportTools\i386 folder
- 64-bit servers, run it from the SupportTools\AMD64 folder
- It’ll ask for the password, type it in and press the enter key. After a few seconds (it won’t show that it’s doing anything) it will have completed. *After a few minutes check the event log on the client for events with ID 20053, this will show that it’s working. The logs are in the Operations Manager listings.
- Other than deleting any files on the file system you’ve created (the key files are insecure and shouldn’t be left lying around) check in the SCOM Console to ensure monitoring is working and you’re all done.