So, the van was annoying me (I drive a 1980 Holden panel van as my daily driver) and I was looking for something to do - I’m notorious for needing “projects” to keep me occupied, as my coding and so forth doesn’t really make me do anything physical. A mate was moving to Perth and his car was most likely going to a wreckers because the engine block had a hole in the side of it. I ended up buying it for a grand total of $300, which isn’t bad for a rolling car that needed a new bottom end in its motor, a new steering arm, and a bit of bodywork. Once that’s all done, it’ll obviously need registration etc, but that’s just part of the fun!

Ok, so as I said, the van was pissing me off no end, costing me a massive amount of money for what was effectively no real gain. It’s fuel hungry, and needs a lot of work to get it to a state where I’d be happy driving it forever. (not that I wouldn’t right now, but I’m not terribly happy with it being freezing in winter, hot in summer, a bitch to drive when it’s cold, leaking and so on and so forth) The plan, therefore, is to make the Gemini my daily driver. I’ve always liked the shape of the cars, they are little, they are light, and they have a pretty decent suspension/engine setup. Oh, and they are rear wheel drive!
So, it wasn’t a bad car - it wouldn’t take much to be an alright daily driver, but as anyone that knows me would tell you, I can’t put up with things being just “alright.” I have to make them my own.
First Looks
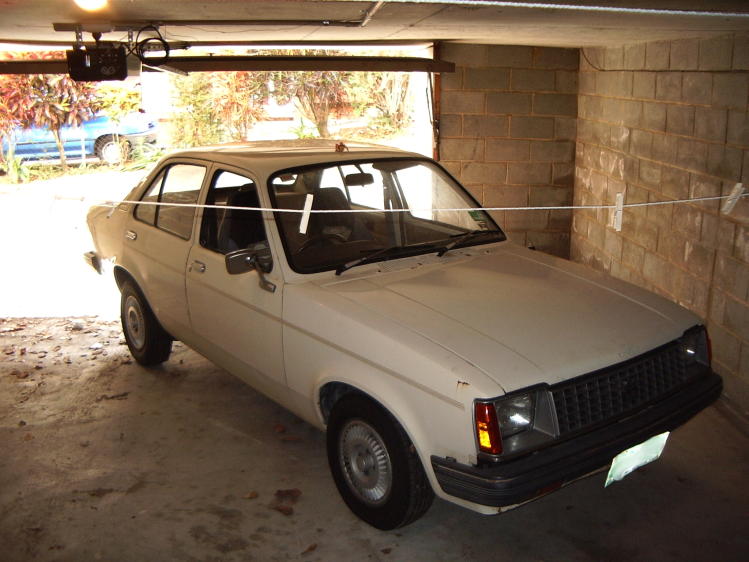
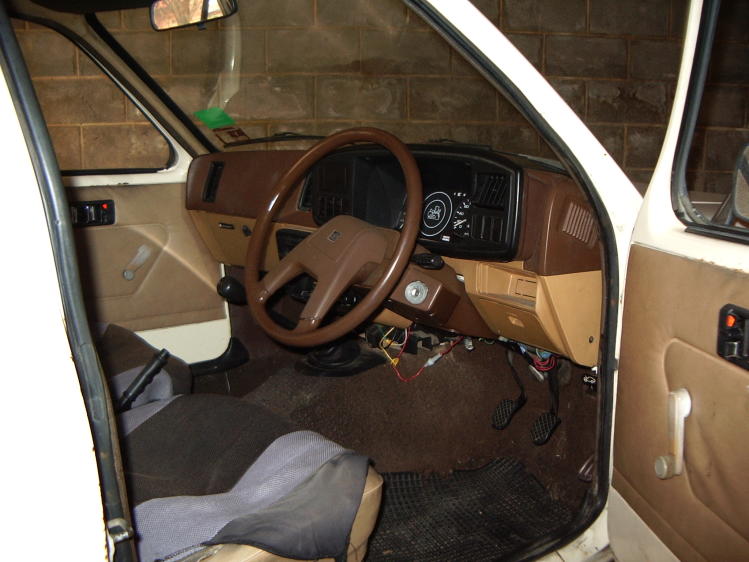
So that’s what it looked like when I got it. Rather boring beige paint that was falling off (or had been kicked/scratched/otherwise) off. Not a bad interior, the seats looked alright once the seat covers came off - but they are rather boring cream vinyl, with no lumbar or sideways support. The door trims are in good condition, dash is cracked in a few places, but that’s usual for a 22 year old car.
The plan with the interior to start with is to clean things up a bit, retrim things in a colour that fits with the colour it’s going to be painted and make things comfortable.
The Original Engine
The original engine that came with the car is an Isuzu G160Z. The G is the series, the 160 means it’s a 1.6lt and the Z means it’s a single overhead cam. There is another version in the G series of motors with a W on the end, and they are the Double Overhead Cam engines. Rare as hen’s teeth, with parts being a serious problem to get, it’s an engine only crazy rich people with nothing else to do would own. The engine that came with the car was one of the first things to be worked on, since having a hole in the side of the block can cause serious problems with keeping oil pressure. (among other things)
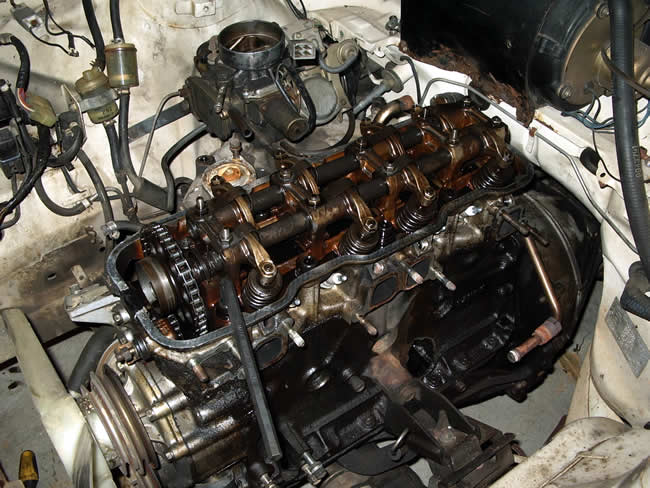
The first thing that I needed to do was to get the engine out. My goal was “to get the engine out by the end of the week” which gave me from the Wednesday (1st June) afternoon when the car was dropped off, until midnight Sunday (5rd June 2005). I basically spent every hour while I wasn’t asleep or at work, pulling bits off the engine. Starting with the head and the intake/exhaust setup, I pulled things off methodically, taking photographs on my digital camera of every single step of the way, so that if I do have problems putting it all back together, then I should be able to find out what’s going on, and where things are.
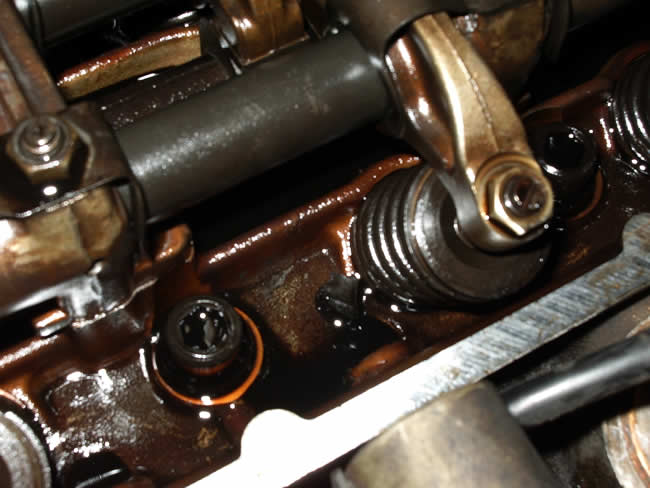
Ok, so there’s some photos of the engine bay as I went, taking off the timing cover, as the exhaust came off and so forth. The third photo on the right is a shot of the head, near one of the intake valves. It’s a bit hard to see, but to the right of the bolt is a little black mass - that is a piece of cast iron from the engine block. The only way I can work out that it could have possibly got up there is by ricocheting off the sump and crank, getting caught up in the timing chain, then bouncing its way along the cam/rockers/valve springs until it got to where I found it. That’s a long way to go for a piece of cast iron that originally came from the bottom end of the engine, but it got there nonetheless.
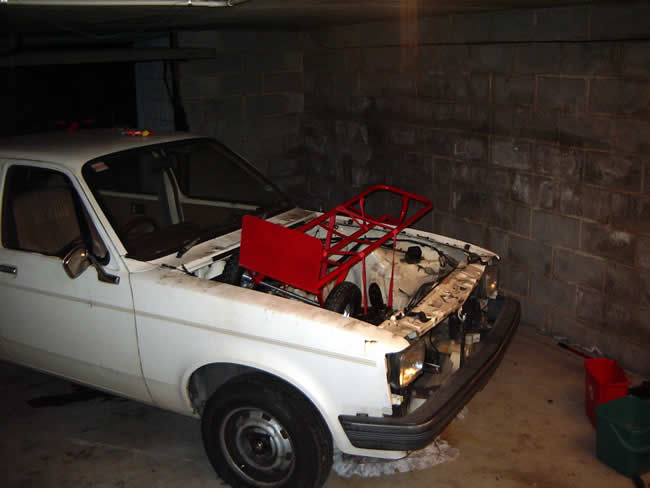
Ok, so this is a study in how NOT to remove an engine. Being the cheapskate (and poor person) that I am, I couldn’t afford an engine crane - the cheapest one I could find was $299 at the local SuperCheap. I needed a trolley for shifting big things around (like spare engines and fridges) so I bought one that day from Repco for the princely sum of about $30. I didn’t think that the engine would be heavy enough (in its stripped-down-to-just-the-block state) and thought I could pull it out with the help of a mate. Seeing as it was in the engine bay, things werent that easy, so we had to find another way. Enter the trolley! Basically (if you can see it) the way we did it was to get some of my super-strong cargo tiedowns, and tie each end of them to the front/back of each side of the engine, through the frame of the trolley.
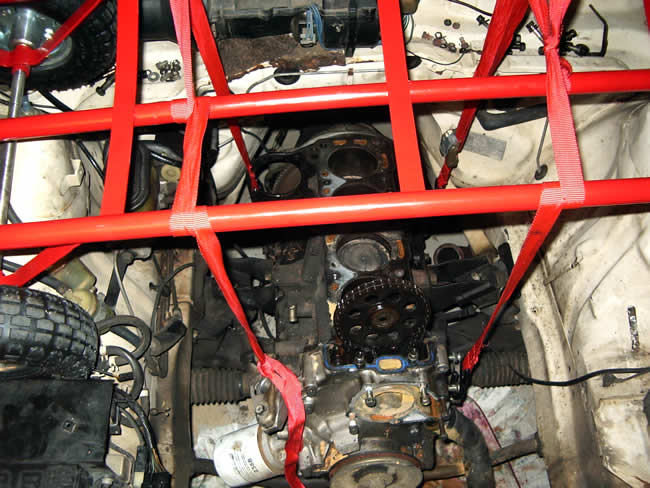
The idea was to “just lift the engine out.” As usual, that annoying guy Murphy had to come along and screw up all our plans. I don’t like Murphy, he bugs me. We had the right idea, lifting the engine out would have worked, if we were about a foot taller, and a bit stronger. Lifting wasn’t too bad, it was pretty heavy, but we got over it. Getting the trolley/engine combination high enough to clear the radiator support - that was the main problem. We got it to a point where 5cm higher would have been fine, and the sudden realisation that we weren’t going to make it hit. Desperation kicked in, and we ended up swinging the engine up and out, and then rather than (again, as we had planned) positioning it nicely with the engine stands under the engine mounts, we basically gave up on that idea and put it on the floor.
Engine Options and the First Engine…
So, the old block was out, and it was time to find a new engine. There are quite a few options for engines to go into the Gemini - since it’s got such a big engine bay for its size, it’s a simple layout, and I was starting fresh. There were quite a few things I was thinking of for it, including:
- A worked G160Z/G180Z/G200Z
- Mazda 13b turbo rotary
- Holden Rodeo 2.4 / 2.6lt EFI
- Holden Commodore 3.8lt Conversion
There are pros and cons for each of the different conversions - the rotary is an easy swap in, needing a new crossmember and a mod plate, the Rodeo engine is basically a bolt in proposition, and the commodore is (as I have found out) a completely insane money pit which only rich nutjobs with too much spare time can do.
Ok, so the easiest thing to do was to build another G series engine - they are cheap, parts are easy to get (yay for being out of a holden in Australia and also having their own racing series) and they are a known performer with lots of go options to make them go faster. My friend Robert and I went looking for a new engine - all I needed was a short motor (block/pistons/rods/crank) but a full engine would have been nice to find as well.
Narcolepsy and I went looking for an engine for the Gemini on the 10th of June, starting at the park ridge wreckers. We toddled through the engine/gearbox section, nothing jumped out as being what we were looking for (since nothing was labelled, and it’s a pain to see what’s what quickly) so we wandered out into the yard. After wandering around a while and nearly getting run over by a giant car forklift thing, we found a group of four geminis - one with a G160Z, one with nothing, and the third, a G180Z! Just what we were looking for.
The engine looked like it had just been rebuilt, it’s quite amazing how clean and new it looked. It’d been sitting in the rain for a little while, but the only thing that seems to have been affected (that we could see) was the cam, with a little bit of surface rust - something that’s probably going to be replaced anyway.For the princely sum of $250, I bought myself a G180Z long motor, picking it up on the 11th.
On the picture on the left, you can see the marks from the exhaust valves slamming into the pistons. There are a couple of reasons why this might have happened - either the timing gear was off by a tooth or two, or the head has been shaved enough to bring it down far enough. We’re thinking that it might not be the shaved head issue, because the inlet valves are more likely to hit in that situation, which has not happened.
Exhaust and EGO Sensing…
I was going to use the stock manifold initially while it was running naturally aspirated, since it would save me some money and help me get the car on the road faster. While I was trolling the Forums and trying to find myself a few other bits, I saw that someone was trying to get rid of a set of Genie extractors and a 2″ full exhaust system. 2″ is a good size over stock, giving me a big more flow, and I’ve been told that Genie make good products overall. So, driving up to Deagon and lightening my wallet by $100 scored me a nice looking set of extractors and a replacement exhaust!
On the topic of exhaust gases, one of the most important parts of tuning a car and monitoring it is knowing the fuel mixture you’re running at any particular point in time. The optimum air/fuel mixture for efficient burn is 14.7:1. This gives the best burn, with no leftover hydrocarbons etc.
More Later…
Ok, there will be more later, I just haven’t gotten around to typing it all up yet.
Here’s some links to keep you happy…
- MegaSquirt home page
- DIYAutoTune
- Crow Cams and their Gemini Camshaft Page
- HotGemini Forums
- Innovative Motorsports and their LC-1 Wideband Oxygen Sensor and Controller package
More later!